
This year I wanted to make my special Valentine an awesome card. My inspiration was this fun fold out book that my sister made years ago:


I decided to put a Valentine twist on it. Of course, feel free to make one for any occasion! They're so fun and easy to make. Some parts can seem a little tricky until you get the hang of it, but once you do you'll be asking yourself why you never thought of this before! Ready? Here we go:
Supply List
- Paper for background (I used a neutral brown)
- Paper cutter (not completely necessary but will save LOADS of time with scissors)
- Colored paper for inside squares and for cover
- Cardboard for cover (2 small squares - I used a box from a Little Debbie snack cake that I had just thrown in the recycle bin)
- Ribbon to tie card shut
- Glue
First step is to cut three 8 1/2 inch squares out of your background paper. If you are using a regular sized paper (8 1/2 x 11) then all you're doing is cutting 2 1/2 inches off of the long side.

They should look like this.

Then we start folding. Fold in half one way.

Open it back up and then fold it in half the other way. You are making the creases so that it will fold properly when it's all put together.

Now it should look like this. One big square with 4 equal little squares.

Then you fold diagonally once.


So now it should look like this. Two little squares and then two squares that now are made up of two triangles each. Do that with all three of your 8 1/2 inch squares you cut out of your background paper. Don't worry too much about wether you creased it the right way, or which way it folds because we'll tweak that as we put it together.

Then you are going to cut out your pretty colored paper to go on the inside of your card. I actually put some on the back of mine as well, so I cut 6 squares. If you only want it on the inside and not on the back, you only need 4. They just need to be 4 inch squares. I alternated between red and pink to keep my Valentine theme going.

Next we're going to glue those pretty 4 inch squares to the background paper. Make sure you glue it only on the squares that are NOT made up of two triangles with your folds. If you are only using 4 squares of colored paper you will end up with one blank background sheet of folded paper. Don't worry, that goes in the middle to help with the folding!

Now comes the trickiest parts. First we have to glue our three big squares together. If you used 6 colored pieces and so you have it on the back too, you just have to make sure that the big square you put in the middle is facing the opposite direction of the other ones. Meaning, the middle big square (one pictured on the right here) has the colored pieces facing down while the other big square has the colored pieces facing up. If you are only using 4 colored pieces, you don't have to worry which way the middle piece is going because it looks the same on both sides!

Then we glue the other side on as well. It should now look like this. This is the inside of your card!

Now we'll get working on the cover. You need two 5 inch squares of thin cardboard. Cereal boxes are great for this, or any other box you have around. You just don't want it to be too thick of cardboard or your card will end up really bulky. It doesn't matter what the cardboard looks like because it will soon be covered with paper.

You'll need two 5 1/2 inch squares of colored paper for your covers. We are only covering one side because the inside of our card will cover the other side of the cardboard. Glue your cardboard square onto the backside of your colored cover paper. Make sure you leave about the same amount of extra paper on each side (get that square, square in the middle if you can!) because you'll be folding it up and gluing it. If you want to, you can cut your cover paper a little bigger (6 inches or so) to give you a little more folding room. I would probably do that if I did this again.

When that is nice and dry so it won't come apart with you folding it, fold up the corners like this:

Then fold and glue the edges around the cardboard so it looks like this. I glued them and then put it under a couple of heavy books for a few minutes to make sure it stayed down where I wanted it.

Now on to the folding! This can seem a little tricky and you'll just have to try it out until it works, but basically you fold up both sides and then the middle square folds inside and it all sandwiches nicely into a square like the one below. None of the colored paper should be showing if it is folded properly. You can test it out by opening it and seeing if you see what should be the inside of your card. If not, try changing the direction of the creases of the middle big square.
Once you've conqured the folding beast, you're ready to glue that baby onto the cover. Make sure that you line up the papers if you want a certain part to be the first part of the inside of the card with the front cover. Glue the front cover to the stack of folded card. Mine again went "under the books" to give it some pressure to make sure it was nice and tight.
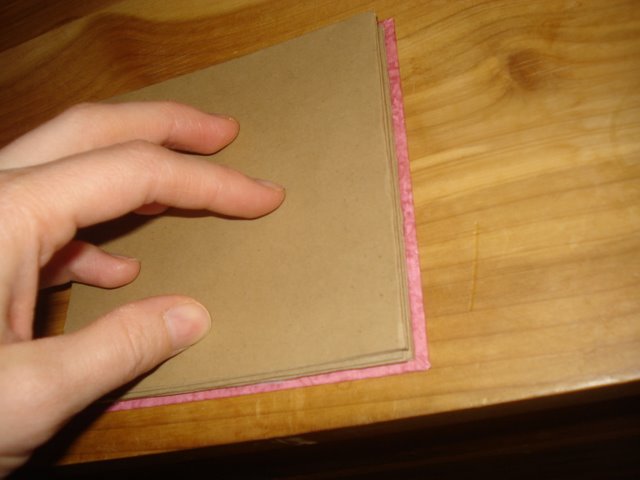
It will look like this if you pick it up now.

Now, this step is VERY IMPORTANT because if you forget this step, you will be tearing off the back cover and re-gluing it again...like I did. I didn't feel it was necessary to document that with pictures...
Before gluing the card to the back cover, cut a piece of ribbon long enough to tie around the whole thing and make a nice bow. You can decide how long you want the bow "tails" and cut accordingly. I cut mine pretty long and then ended up cutting some of the extra off, which is a lot easier than the alternative! Glue the ribbon onto the inside of the back cover leaving equal amounts on either side of it. THEN glue the card over the ribbon and onto the back cover. It should look something like this:

And now you can tie it up with a pretty bow!

This is the front view of it all opened up:

And this is the back:

You did it! Now you can decorate this amazing fold out card any way you like. Here's a sneak peak at what I did for my Valentine. This is the "not yet completed" version. I put in the other spots where there wasn't colored paper, reasons why I love him.
Enjoy!
.JPG)
.JPG)
No comments:
Post a Comment