3.16.2012

Spring Cleaning

Spring Cleaning.  I love it.  Even though the groundhog saw that shadow and predicted more bad weather, I've gotten into the Spring Cleaning mood!  I think it's the fact that we had 78 degree weather most of this week so I feel like winter is over!  Or maybe, I just got tired of my unorganized front closet that I couldn't really get into without something falling on me.  So, I've been meaning to make a chore chart to keep myself and my family organized when it comes to getting things done around the house.  After looking at some ideas and tweaking things here's what I came up with:


Okay, so that picture doesn't do it justice.  I really need a better camera...

I love the idea of the magnetic chore charts because they're easy to move around and can be stored on the side of the fridge, which is great for us because we don't have a lot of extra space around our mini house.  I just used colored electrical tape (I got mine at Home Depot) and a Sharpie to create the grid for each of us.  They love having their own colors and their initial right about their row.  It makes it more like a game than chores! This was so easy to make, and pretty cheap too.  I've noticed a HUGE difference in the help I get around the house now that it's fun to move your magnet over to the "Done" category.  Why didn't I think of this before?

We also created a reward system that I'll post more about later. 

Here's how I made my magnets.

Like most good projects, I started with a PowerPoint slide to get my thoughts together.  I LOVE PowerPoint.  I was able to insert a circle the size of my circle punch from Michaels (mine is 1" round) so I could make sure the text would fit on my circle before printing it out.  Since I wanted three different colors too, I was able to just make three separate slides so it would print out on the color it was supposed to be.  Fantastic!

Then you print that baby out and punch out the circles.  You could also cut them out with scissors, but you'll love this a lot more if you have a punch!  It's totally worth it!  I color coded mine with green being the quick, easy chores; yellow the in-between, more effort chores; & red being the time consuming/ones people hate to do chores (i.e. cleaning the toilets).


Next, I went in search of wooden circles.  They did have some at Michael's but they weren't exactly what I was looking for, so I opted for a wooden dowl a bit bigger than an inch so my punched out circles wouldn't go quite to the edge.  Luckily I have a handyman living in my house who happens to love me a lot and will do almost anything for me...so a few minutes with the chop saw and I had this:

Yep.  I tupperware full of ready to be chore magnet circles!

Then we sanded the rough edges off with the Dremel, but you could easily do it with regular sandpaper, just enough that it wouldn't cause any slivers in little hands.  Then I spray painted mine with some leftover gray paint we had in the shed:


It was a nice day, so they dried super fast and we glued the chore circles onto those circles.  You don't have to worry to much about making sure the edges are down well because we Modge Podge over the whole thing.


After that's all dry, you flip them over and glue a magnet to the back.  I like the little circle magnets because they're strong and the perfect size for these little circles.


Let that glue dry and there you have it!  Organization for chore time!


3.07.2012

I {heart} Organization!


So, I love to find fun things to keep my life, home and family organized!  Really.  It's almost an obsession.  When I first heard of The Container Store, I basically thought that store was made just for me.  So, I was looking around for ideas and came across this giveaway.  My lucky day!  They have some pretty amazing products from Clever Container Organizing.  You should check it out (and don't forget to enter the $50 giveaway!)  Here are a few of my favorites from Clever Container.  Which is your favorite?


Black Scroll Fruit Basket 
LOVE this!
Curved Shelf Dividers
This would definitely help my closet situation to keep things in a nice stack!


GripIt 3-Ring Binder
Talk about being prepared with anything and everything you would need!


Electroman
The name is as cool as the product.

Bin Packet
I could use like 20 of these.

File Tote Box
Classy and Useful

Chrome Letter/Key Holder
I was just thinking of trying to find something like this yesterday when I realized I couldn't find my keys and I had mail that needed to go out...like 2 weeks ago.

3.04.2012

Farm Animal Puppets

Check out the Barn Bag for a fun idea to help keep these animals together!

I'm so excited to share this tutorial with you! I've been meaning to put this up for awhile now and hope you enjoy it. I apologize ahead of time for the length of the tutorial, but I put in lots of pictures! I got the idea for these cute little guys from this post from Just Another Day in Paradise.  I just had to try them out, so I used some of her templates and then ended up making my own which you can access HERE.  

Here's what you have to look forward to:


Excited? Okay, well let's get started! I have some general guidelines and then I'll do a section for each animal so you can see how they each go together.

First things first...supplies:
  • Felt. I just used the $0.29 sheets of felt from Michael's. The list below for the colors you need is to make them just like I did. If you want to change the color of any of them, go ahead! Make it your own! If you have scraps of felt, you only need a little bit of the Orange, Dark Red, Cream and Black. You can get one "body" out of each piece of felt and then use the scraps for all the accent pieces. Here's the color list:
    • 2 Sheets White
    • 1 Sheet Copper
    • 1 Sheet Dark Brown
    • 1 Sheet Charcoal Gray
    • 1 Sheet Light Gray
    • 1 Sheet Oatmeal
    • 1 Sheet Golden Yellow
    • 1 Sheet Tan
    • 1 Sheet Pink
    • 1 Sheet Orange
    • 1 Sheet Dark Red
    • 1 Sheet Cream
    • 1 Sheet Black
  • Embroidery Thread to match each of the colors of felt (or compliment if you want...i.e. I used a dark brown thread on my chicken so you could see the stitches really well.)
  • Needles big enough to fit all 6 strands of the embroidery thread through
  • Scissors
  • Something to trace the pattern pieces onto the felt. I used my trusty fine-tip Sharpie!
  • Animal Template printed & cut out. I did mine on cardstock because I knew I would be using them over and over again. I found it easiest to keep them separated by animal in ziplock bags. Then you know you have all the pieces for each animal in one little compact place.
    • Notice there are three copies of the "body" so you can cut them out for the Regular Body, Bird Body, and one with the "fluff" head for the sheep. Believe me. It's totally worth printing and cutting out the three different ones. It'll save you a LOT of hassle.
A Few General Guidlines & Tips:
  • I found it's easier to cut out all of the pieces for every puppet first. I use my handy ziploc sandwich bags to keep the pattern pieces and the cut out felt peices together by animal.
  • With the embroidery thread, I use all 6 strands to sew these guys together so it will be more noticeable. I just thread the needle, knot the end and I'm ready to go!

  • Sometimes, I like to thread several needles with all of the colors that I will need for that puppet, to save time later as I'm sewing peices on. 

  • The Order of sewing:
    • Front and Back Pieces (Bellies, Noses, Feathers, Tails, Paws, etc)
    • Eyes. Here is how I did my eyes:
    • Figure out where you want your eye to be. Sew one stitch the height you want your eye to be.

      Sew two more so there are three total. This part won't be seen, but adds some depth to it so it doesn't look just like a few lines sewn on for eyes when you're done.

      Come up on one side at the top of those three stitches you just sewed.

      And go down on the other side of the top, making horizontal lines over the vertical stitches.

      Do those horizontal stitches all the way down the vertical stitches and you have your eye!

      Go over to where you want the second eye (I don't bother cutting and tying the string, just head on over there!) and line it up so it is straight with the other eye and repeat the process. Viola!
    • Ears (if any) together. There are two types of ears:
      • Ear One: Flat Ears

      Put both peices of the ears together, making sure that the outsides are outside! Start sewing at the bottom corner.
      Sew around the whole ear and tie it off. You don't have to worry about sewing across the bottom because it will be sewn in when you sew it into the animal head.
      • Ear Two: Gathered Ear
These start out the same as the flat ears. Start at one bottom corner.
Sew all the way around, but don't tie off the thread just yet. Again, you don't have to worry about sewing the bottom of the ear because it will be sewn in when you sew the ears on the animal head.
Now, pinch together the bottom of the ear.


Sew a stitch through the pinched ear at the bottom. You can do a couple of stitches if you want.
Then tie it off and you have a gathered ear. Believe me. It's worth the extra couple of stitches when you start putting them together. It looks a lot better.

    • Then Body Pieces together, making sure to sew the ears in when you get to that part of the head. Beleive me...it's not very fun to have to undo it to put the ears in.
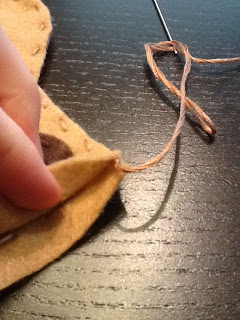
      • To sew the body peices together, you'll want to start at the bottom corner of one and work your way up towards the hand and then around the head and down the other side. Make sure you don't sew the bottom shut! I like to start with my knot on the inside of the puppet like this:

      • Once you've sewn all around, I like to go back in so the knot will be on the inside
        Tie it off and you're done!
    • Hooves go on last.  Here is how you put them on:
    • Put both hoof pieces together, and start with your knot on the inside because you'll be able to see both sides when we're done.  Start at one corner of the flat side.

      Sew along the flat side of the hoof.

      Slide the hoof on the hand of the animal and get it where you want it.  I like to put the top of the hand right up against the top of the hoof that I just sewed.

      Continue sewing around the hoof, going through the hand as well.

      Tie it off on the inside, then repeat with the other side.

  • You can decide how close together, and how big/small you want your stitches. It's a different look with either big or small stitches. I will just throw out there that bigger stitches go faster. Just saying.


    Ready? Okay. We'll start with an easier one. 

    Quack, Quack

    • Pieces to cut out:
      • 2 Golden Yellow Fowl Body peices
      • 3 Golden Yellow Tail Feathers
      • 1 Orange Duck Bill

    Arrange the pieces so you know where they go. (Back view on left, Front view on right...Captain Obvious...I know.)


    Start Sewing! Use just a simple stitch that I like to call "Up, Down" and sew the duck bill on the front and the feathers on the back.
    For the feathers on the back, I like to lay all three down to get them where I want and sew them all on at once as if it was one piece instead of three. 

    Here's how it should look before you sew it together.

    The Finished Product!
    Easy, right?  Okay, keep going!  They get a little bit harder as we go along, but you can do it!  I just put pictures in the rest of the tutorials unless there is something that needs explaining. 

    Cluck, Cluck

    • Pieces to cut out:
      • 2 Oatmeal Fowl Body pieces
      • 1 Golden Yellow Chicken Beak
      • 1 Dark Red Chicken Head Piece


    NOTE: When sewing on the red chicken head piece, you only sew on the bottom half of it because it hangs off the top of the head a little bit.  You'll see what I mean when you see the next picture.

    When sewing together the body pieces of this one, make sure and sew UNDER the read chicken head piece. 
    Two down!

    Oink, Oink
    • Pieces to cut out:
      • 2 Pink Regular Body pieces
      • 4 Pink Pig Ears
      • 1 Pink Piggy Snout
      • 1 Pink Curly Tail
      • 4 Light Gray Hooves
      • 1 Light Gray Belly


    Close up of how I sew the pig tail on. 

    Don't forget the ears as you sew the pig up!

    Hooves go on last.  You should be feeling proud of yourself just about now.


    Baa, Baa
    • Pieces to cut out:
      • 2 White Fluffy Head Body pieces
      • 1 White Lamb Tail
      • 4 White Lamb Ears
      • 1 Cream Lamb Face
      • 1 Cream Belly
      • 1 Pink Lamb Nose


    I found it easier to sew the whol lamb face before sewing it onto the body.  For the mouth I just did one longer stitch and then used a little stitch to pull it down so it was kind of in a smile.  You can just play around with it until you get something you like.

    Gotta love that cute fluffy tail.  With this one you may have to cut a little extra fluff off the top if the fluff on the front doesn't line up with the fluff on the back.


    Moo, Moo
    • Pieces to cut out:
      • 2 White Regular Body pieces
      • 4 White Cow Ears
      • 1 White Cow Tail
      • 4 Dark Gray Hooves
      • 1 Golden Yellow Cow Bell
      • 1 Oatmeal Cow Nose
      • 1 Black Cow Tail Tip
      • Black Cow Spots


    Notice the gathered ears on this one.

    You can leave the cow bell off if it's not your thing.


    Meow, Meow
    • Pieces to cut out:
      • 2 Dark Gray Regular Body pieces
      • 1 Dark Gray Cat Tail
      • 4 Dark Gray Cat Ears
      • 1 Light Gray Belly
      • 2 Light Gray Big Paw Circles
      • 6 Light Gray Tiny Paw Circles
      • 1 White Cat Mouth Piece
      • 1 Pink Cat Nose
    Sorry about the poor quality of the pictures.  Bad lighting + iPad camera + trying to blance/take picture & keep toddler away from felt pieces = these kinds of pictures.  The nose really is pink, and the cat mout is white, not glowing white like it looks in this picture.


    Sew the white mouth piece on first and then the cute pink nose on after that.
      
    The ears are flat on this one.  Play around with placement of the ears before you sew them on.  It gives it a different look depending on where they are on the head.

    Yes, those paws were worth it!

    Woof, Woof
    • Pieces to cut out:
      • 2 Tan Regular Body pieces
      • 4 Tan Dog Ears
      • 1 Tan Dog Tail
      • 1 Dark Brown Dog Tail Tip
      • 1 Dark Brown Dog Mouth
      • Dark Brown Spots
      • 1 Cream Belly
      • 1 Cream Eye Patch
      • 1 Black Dog Nose
      • 2 Black Big Paw Circles
      • 6 Black Tiny Paw Circles


    If you want your dog to look less like a rabbit, you can stitch the ears down like this.  Or you can leave them up so they can flop around.


    Ready for the last one?  Here it comes!

    Neigh, Neigh
    • Pieces to cut out:
      • 2 Copper Regular Body Pieces
      • 4 Copper Horse Ears
      • 4 Dark Gray Hooves
      • 1 Dark Brown Belly
      • 1 Dark Brown Horse Tail
      • 1 Dark Brown Horse Nose
      • 12 Dark Brown Horse Hairs (Don't worry...these look a lot harder to sew on than they are! You can do it!)
      • 1 Cream Horse Nose Stripe


    Okay.  The horse hair.  Here we go.  First, you need to fold over one piece so it makes a loop and just stitch that together so it stays in the loop.  Then fold over a second piece and do the same, but stitch it to the first one when you stitch it closed into the loop.  Then add one on the other side too.  That is the part of the hair you will sew in (just like the ears) between the ears when you are sewing the body together.

    To sew the mane on the back, you do almost the same thing you did for the hair you just finished sewing, except you sew it directly onto the back body piece.  You start by looping and stitching one straight in the middle.  Then you add one on each side until it looks like this.

    Then you do the same thing with two more layers, putting it just under the loop of the previous layer until you have three layers of beautiful horse hair!
    Then you're ready to sew him together!  Just make sure you remember the ears and the horse hair in between the ears.
    This one is definitely my favorite!  The horse never fails to impress when people find out you made these puppets.


    ENJOY!!